
If you recently moved to macOS from Windows, you should know that macOS has a built-in powerful snipping tool that lets you capture snips on Mac. You can use this built-in Snipping Tool to capture screenshots or screen recordings. You can capture the full screen, a selected window, or a specific part selected manually. So, most people don’t need a third-party snipping tool unless they are looking for advanced features.
Before I talk about the best snipping tools for Mac, let me first explain the built-in snipping tool of macOS. I have already talked about this in the article on how to capture screenshots on Mac. For quickly capturing screenshots, these are three different keyboard shortcuts.
- CMD + SHIFT + 3: Makes capture a full-screen screenshot
- CMD + SHIFT + 4: Helps you capture selected area as a screenshot
- CMD + SHIFT + 5: Captures only an active window that you choose
Also see: Best VPNs for Mac
For opening the built-in Mac snipping tool, press Command + Shift + 5. It will open the Mac Snipping tool. Here’s a screenshot of it.

You can see the bottom bar with options to capture full screen, specific Window, or selected part. The fourth and fifth options from the left are to screen record the Window and screen record the selected portion of the screen.
For selecting the location where you want to save the screenshot or screen recording, click on Options. Options Menu also lets you select the Microphone if you want to record audio while recording the screen. In Screen recording, you may also want to use the timer to get ready before screen recording starts.
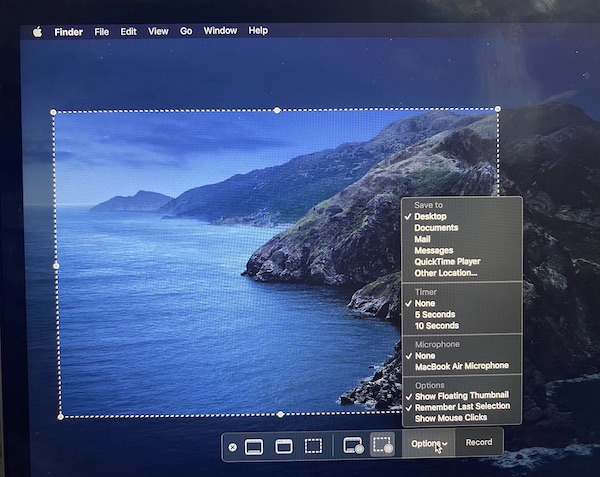
In some tutorial screen recordings, you may also want to show mouse clicks. Mac’s snipping tool also has an option for this.
After capturing the screenshot, macOS shows the screenshot at the bottom right corner for a few seconds. If you want to annotate or highlight something on the Screenshot, tap on that Screenshot before it disappears.
Now you know how to use the built-in snipping tool of the macOS. If you want advanced features, here is the list of best snipping tools for macOS.
Third-party snipping tools for Mac are helpful for those who make visual tutorials and capture several screenshots. People also need cloud storage to store screenshots and screen recordings for further editing.
Snipping Tools For Mac
1. Snagit
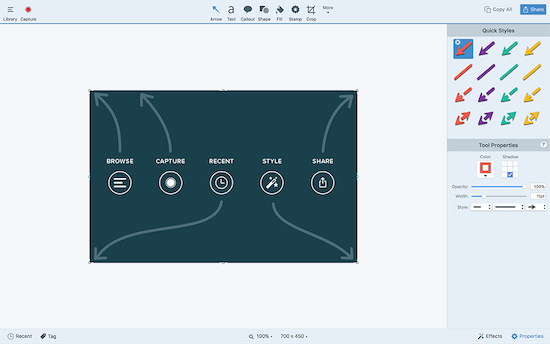
Snagit is premium but really powerful screen capture software for macOS. It is basically for professionals who can use screenshots in reports and emails frequently. You can quickly capture a screenshot or record screen, add visual instructions or annotations, and share. If the screen recording is short, you can also share it as GIF. Along with vertical scoring, it lets you capture horizontal scrolls and infinitely scrolling web pages. So, you can quickly cloture long chats easily. IN screen recording, It can record audio from the system’s microphone or from an external microphone. You can also toggle between webcam and screen recording during a video. This is really helpful for making tutorial videos. After the screen recording, you can also trim video clips.
It also has OCR and can recognize the text in your screenshots. You quickly edit the text, and change the text’s words, font, colors, and size while other things in the screenshot remain the same. Snagit also lets you upload your screen capture and share it directly to YouTube, Word, PowerPoint or create a shareable link to share it with anyone.
Snagit is a premium software. So, you need to pay $50 as a one-time fee to use it for a lifetime. Obviously, this software isn’t cheap but comes with really powerful features.
2. Monosnap
Monosnap is also a good snipping tool for macOS. You can use it to capture fullscreen, area, or window. You can also record the screen as a video or GIF. After capturing the screen, you can highlight details, but the sensitive data and perform another editing like adding text, arrow, or more. In the end, you can upload the screen capture to the cloud storage of your choice. It supports Google Drive, Dropbox, Box, AWS Amazon S3, and more. Monosnap also offers cloud storage.
A single-user license is free but you get just 2GB of cloud storage, 100 MB max file size for upload, and 4GB a month of bandwidth. You cannot upload more than 1000 screen captures a month. There are also premium plans if you need to cloud storage or bandwidth.
3. CleanShot X
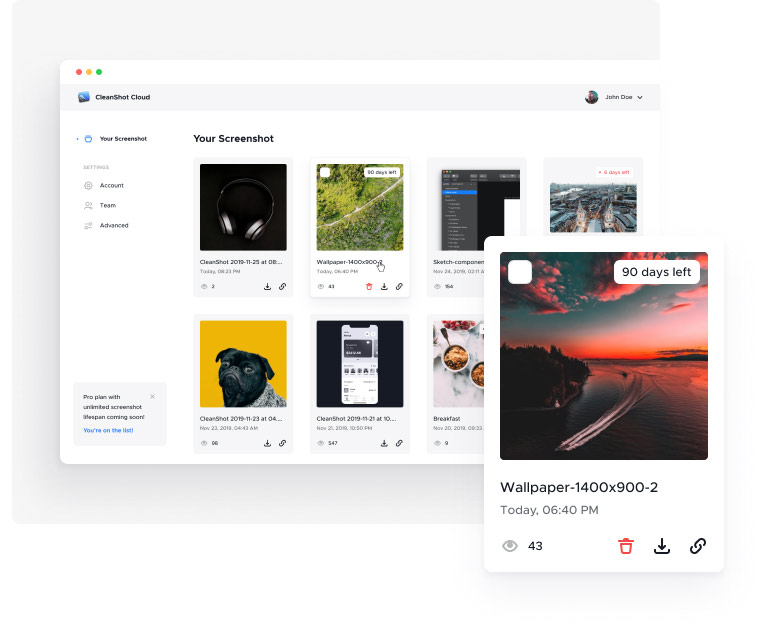
CleanShot X is a powerful snipping tool for Mac that offers a comprehensive set of features for capturing and editing screenshots. One of the most notable features of CleanShot X is its ability to capture full-screen shots, specific windows, or custom regions with ease. The software has an intuitive interface that makes it simple to select the desired capture mode and adjust settings such as image format, quality, and destination folder.
One of the key strengths of CleanShot X is its annotation tools. After capturing a screenshot, users can quickly annotate it with text, arrows, shapes, and other visual elements. This is particularly useful for highlighting specific areas, adding context, or blurring sensitive information. The editing options are robust, allowing users to fine-tune the captured image to their liking.
CleanShot X goes beyond just capturing and editing screenshots. It also includes a screen recording feature that enables users to create high-quality recordings of their screen activity. Whether it’s for tutorials, presentations, or sharing moments from a video call, this feature comes in handy.
Another notable feature of CleanShot X is its organizational capabilities. The tool provides a built-in library where all captured screenshots and recordings are stored, allowing users to easily access and manage their media. Additionally, it offers a handy menu bar icon that provides quick access to capture options and recent captures.
4. SnapNDrag

SnapNDrag is also a good snipping tool for macOS. You can use it to capture screenshots of the full screen, a specific part of the screener a Window. It keeps a library of your screenshot and also lets you share your screenshots quickly. After capturing the screenshot, you can also highlight something on it by using the annotation tool.
It is really easy to use and is available for free. The free version comes with a limited feature. If you like this tool and to use it with all its features, get the pro version.
5. LightShot

LightShot is a good app that lets you capture a screenshot of a selected area. This tool also has a built-in editor for editing or annotating the screenshot.
Once you have captured the screenshot, you can also upload it to the LightShot server and get the link to share the screenshot with anyone. This feature makes it interesting. You can also quickly search for similar images you captured using the snipping tool.
6. Greenshot
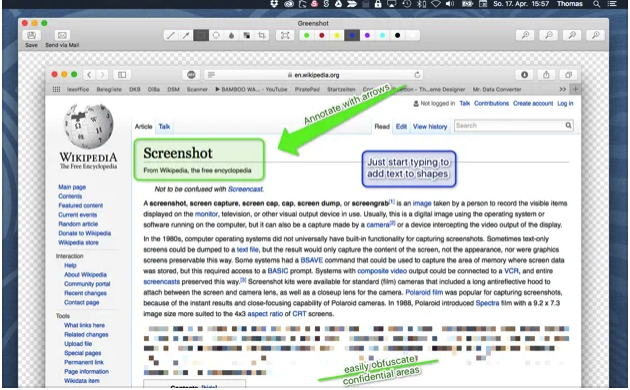
Greenshot is a powerful screenshot-capturing tool for macOS. It lets you capture a screenshot of a selected region, window, or entire screen. After capturing the screenshot, you can annotate or highlight it. It also comes with a built-in OCR. Once you are done, you can export the screenshot in several ways. This software is available for both macOS and Windows. Windows users can get to it for free but Mac users need to pay. The cost is just $1.99, so anyone can easily afford it.
Due to the Privacy MacOS Catalina and above, you need to enable the Screen recording permission for Greenshot by going to Security & Privacy -> Privacy -> Screen recording. Don’t forget to do this before using the Greenshot.
7. Flameshot
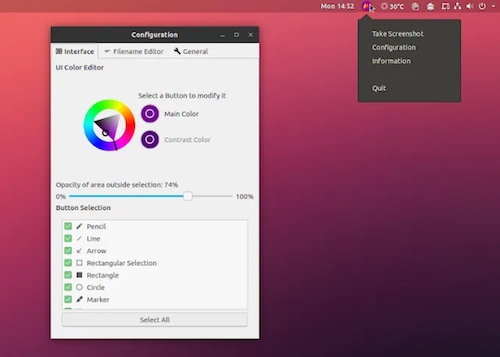
Flameshot is a lightweight and open-source snipping tool for Mac that offers a simple and straightforward approach to capturing and editing screenshots. While it may lack some advanced features found in other snipping tools, it excels at its core functionality and provides a smooth user experience.
Flameshot makes it easy to capture screenshots by providing different capture modes, including full-screen, window, and custom region. The captured image can then be edited using a set of basic annotation tools. These tools allow users to add text, draw shapes, highlight areas, and blur sensitive information. While the editing options are not as extensive as those found in more feature-rich tools, they are sufficient for most basic editing needs.
One of the notable features of Flameshot is its ability to upload screenshots directly to various image hosting services, which can be convenient for quickly sharing images online. The tool also allows for easy saving of screenshots to the local disk.
Flameshot also enables users to trigger various functions by using keyboard shortcuts.
While Flameshot is a reliable snipping tool, it does have some limitations compared to more comprehensive options. Advanced editing features, such as pixel-level adjustments, text formatting, or image effects, are not available. Additionally, Flameshot lacks a built-in library or organization system.
Wrap Up
Now you have a list of the best snipping tools for macOS. You also know how to use the built-in screen recording tool of macOS. I personally use the built-in screen recording tool because that’s enough for me. I capture several screenshots to use in the article but I don’t need those pro features offered by third-party snipping tools. Check those and see if you need a third-party snipping tool or if the built-in snipping tool is good enough for you.