Apple has always marketed itself as a company that values user privacy. Over the years, it has introduced several features aimed at protecting user data. One of the most powerful additions in this direction is Advanced Data Protection for iCloud. The feature brings end-to-end encryption to more of your iCloud data, including iCloud backups.
But before you quickly enable it, you need to learn its actual meaning, how it works, and what things you need to be careful about. In this article, I will break it all down for you — how it works, why it matters, and how you can enable it.
What is End-to-End Encryption in iCloud?
In simple terms, end-to-end encryption means that your data is encrypted on your device before it ever leaves. Only you can decrypt it. Even Apple cannot access your information, because it does not have the keys to unlock it.
Until now, Apple has already used end-to-end encryption for things like your iCloud Keychain, Health data, and Wi-Fi passwords. But your iCloud backups, which often include sensitive data like messages, app data, photos, and notes, were encrypted in transit and on the server, not end-to-end. That means Apple still held the encryption keys and could technically access your data in rare cases, such as government requests or data recovery.
With Advanced Data Protection, that changes. Apple no longer stores the keys to decrypt your backups. You are the only one who can access that data, which makes your information significantly more private and secure.
If you care about privacy — and you probably do if you are reading this — then enabling Advanced Data Protection is a big step forward. With this feature enabled, your iCloud backups, Photos, Notes, Reminders, Safari Bookmarks, and more are all end-to-end encrypted. This means that even if Apple’s servers were ever breached, your data would remain protected because it is unreadable without your encryption key.
This is especially useful if you store sensitive personal or professional data on your iPhone or Mac. Whether you are a journalist, a business owner, or just someone who wants peace of mind, having that extra layer of security is worth it.
But There’s a Catch
There is one big trade-off you need to understand before enabling this feature. After enabling this feature, you will be fully responsible for your own data recovery.
When you enable Advanced Data Protection, Apple can no longer help you recover your data if you lose access to your account. That means if you forget your Apple ID password, lose your trusted device, and cannot access your recovery key or recovery contact, you will lose your data permanently.
So, before you enable it, Apple requires you to set up one of two things:
- A recovery contact – someone you trust who can help you regain access.
- A recovery key – a 28-character code that you must store securely.
Do not skip this step. Losing your recovery method means losing access to your encrypted iCloud data forever.
What Gets Encrypted?
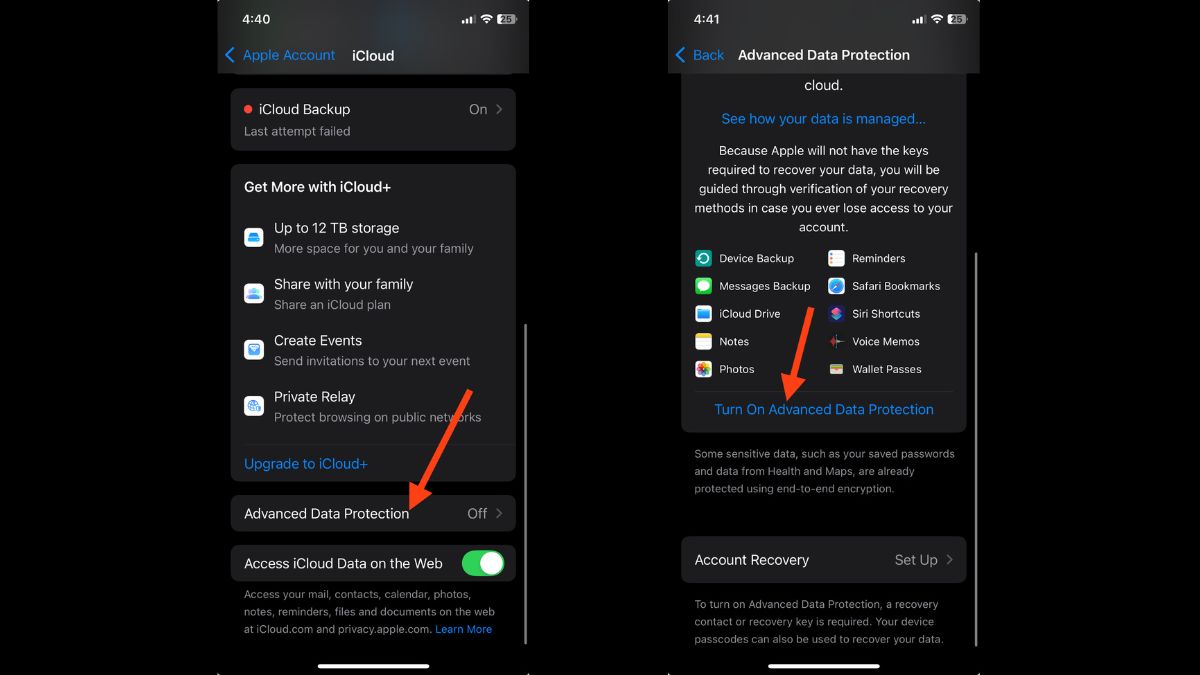
Once you enable Advanced Data Protection, the following types of data will be end-to-end encrypted:
- iCloud Backup
- iCloud Drive
- Photos
- Notes
- Reminders
- Safari Bookmarks
- Siri Shortcuts
- Voice Memos
- Wallet passes and more
It is worth noting that Mail, Contacts, and Calendar are not encrypted end-to-end due to the need for interoperability with global systems like email and calendar standards.
How to Enable End-to-End Encryption (Advanced Data Protection)
Enabling the feature is fairly straightforward, but make sure all your Apple devices are updated to the latest software. Older devices that are not updated will be signed out of iCloud once you turn this on.
Here’s how to enable it on your iPhone:
Open Settings. Tap your Apple ID at the top. Now Tap iCloud.
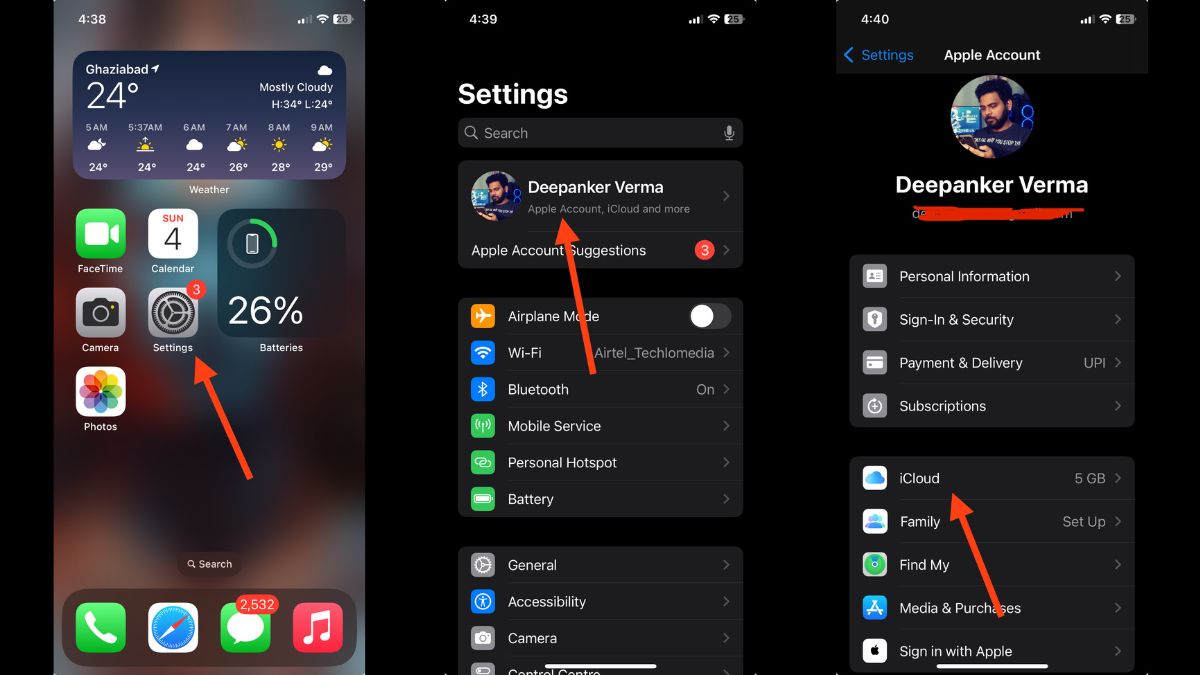
Scroll down until you see Advanced Data Protection and tap on it. Now it will open the Advanced Data Protection page. Here, you have to use the Account Recovery section to set up the Account Recovery key. It is important.
After you have set up the Account Reciverty, tap Turn On Advanced Data Protection.
Follow the instructions to complete the process.
If you are using a Mac, the process is similar. Follow these steps:
- Go to System Settings
- Click on your Apple ID
- Click iCloud > Advanced Data Protection
- Click Turn On and follow the same steps as above.
Things to Keep in Mind
While Advanced Data Protection is a great feature, it is not something you should turn on casually. You should know that web access to some encrypted data may be limited unless you enable it manually. Since you are now responsible for your data recovery, use a password manager or keep your recovery key in a secure physical location. All your devices must be updated, otherwise, the device will be signed out and lose access to iCloud. Here’s the supported OS list:
- iOS 16.2 or later
- iPadOS 16.2 or later
- macOS 13.1 (Ventura) or later
- watchOS 9.2 or later (if paired)
Final Thoughts
Advanced Data Protection is one of the strongest privacy features Apple has ever introduced. It gives you complete control over your iCloud data and ensures that your most personal information stays personal, even from Apple itself. If you are confident in managing your account and recovery options, and you care deeply about data privacy, then enabling this feature is a smart move. Just make sure you understand the responsibility that comes with it. Once it is on, the security is rock solid, but so is the lock if you lose your key.