Procreate is a popular digital illustration and painting app for iPad. It features a wide variety of brushes to paint and draw, including pencils, markers, and paintbrushes. These brushes can be used to create a wide range of art styles and effects.
The brushes in Procreate can be customized according to the user’s preferences, allowing for a high degree of control and creativity. Some of the key features of Procreate brushes include the ability to adjust size, opacity, and flow, as well as the ability to create custom brushes by importing or creating new brush textures.
Additionally, Procreate’s brushes support pressure sensitivity. This allows for more natural and expressive brush strokes. Overall, Procreate brushes are a powerful and versatile tool for digital artists, providing them with the ability to create a wide range of art styles and effects.
How to Customize a brush in Procreate?
Procreate is a powerful digital illustration and painting app that allows users to create stunning artwork on their iPad. One of the most versatile features of Procreate is the ability to customize brushes. In this article, we will show you how to create your own custom brushes in Procreate.
Step 1: Select a brush

The first step in creating a custom brush is to choose a brush to use as a starting point. Procreate comes with a wide variety of brushes to choose from, including pencils, markers, and paint brushes. Once you have selected a brush, you can begin to customize it to your liking.
Step 2: Adjust the brush settings

Procreate allows you to adjust various settings for your brush, such as size, opacity, and flow. To access these settings, tap on the brush in the toolbar and select the “Brush Settings” option. This will open a menu where you can adjust the settings to your liking.
Step 3: Customize the shape of the brush
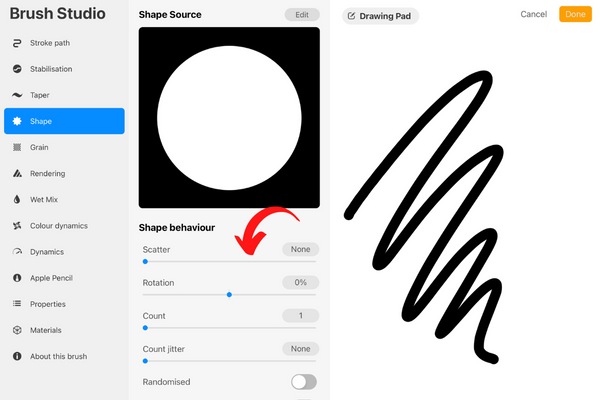
Procreate also allows you to customize the shape of the brush. To do this, tap on the “Shape” tab in the brush settings menu. Here, you can adjust the shape of the brush by adjusting the sliders for size, angle, and roundness. You can also tap on the “Edit” button to manually adjust the shape of the brush.
There are several things you can do to customize your brush even further:
- Use the “Shape” setting to change the shape of the brush tip. This can be useful for creating different types of marks or strokes.
- Adjust the “Fade” setting to control how quickly the brush fades out as you draw. This can be useful for creating smooth transitions between colors or shades.
- Use the “Jitter” setting to add a bit of randomness to your brush strokes. This can help create a more organic, hand-drawn look.
- Adjust the “Texture” setting to add a textured look to your brush strokes. This can be useful for creating a more realistic, natural look.
- Use the “Grain” setting to add a bit of roughness to your brush strokes. This can be useful for creating a more textured, rough look.
- Adjust the “Smoothing” setting to control how smooth or rough your brush strokes appear. This can be useful for creating a more precise, controlled look or a more spontaneous, loose look.
By following these steps, you can customize your brushes in Procreate and take your digital artwork to the next level.
How to Create a brush in Procreate?
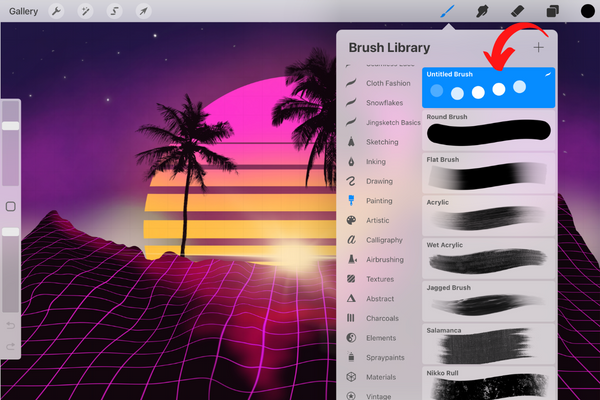
Once you have customized your brush to your liking, you can save it as a new brush. You can also make your own art or brush and save them as a brush. To do this, tap on the “Add” button in the brush settings menu and give your new brush a name. Your custom brush will now be saved in the “My brushes” section of the brush library and will be accessible for you to use in future projects.
Creating a brush in Procreate is a relatively simple process that allows you to customize the way you draw or paint on the app. Here are the steps you can follow to create a brush in Procreate:
- Open Procreate and tap on the brush icon at the bottom of the screen. This will open the brush library.
- Tap on the plus sign (+) in the top right corner of the screen to create a new brush.

- Select the brush type you want to create. Procreate offers a wide range of brush types, including pencils, pens, markers, and more.
- Customize the brush settings to your liking. You can adjust the size, opacity, and flow of the brush, as well as the texture, grain, and smoothing.

- Give your brush a name and tap on “Save” to create the brush.
- To use the brush, select it from the brush library and start drawing or painting on the canvas.
Read more, Is Procreate worth buying for Beginners?
In conclusion, Procreate offers a wide variety of brushes and the ability to customize them to your liking. This is a powerful feature that allows you to create brushes that suit your specific needs and style of working. With these tips in mind, you should be able to create a wide range of custom brushes in Procreate and use them to express your creativity in new and exciting ways.
Related Posts