Everyone wants to make a perfect DVD to wow his or her friends. Sharing your personalized masterpiece with others will be a great enjoyment. Is there an easy-to-use software to let you make your own DVD? Sure, you are right here. This article will tell you how to customize your DVD with a powerful and advanced DVD creating tool.
When it comes to perfectly customize a DVD, Wondershare DVD Creator will be the best and right choice. You can use it to edit video or photo, personalize DVD menu templates according to your preference, and then burn DVD. Everything included in the DVD can be tailored by you. Just give your talent into full play.
How to Customize Your DVD with Wondershare DVD Creator
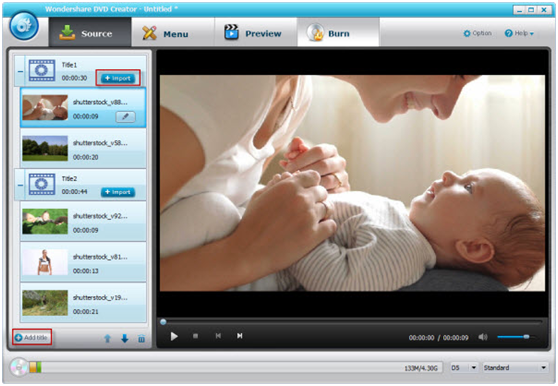
Step 1: Import Video into this application.
After downloading and installing the application, please import your videos or photos into it.
To change the order of the imported media, you can just drag it to the right place and drop it.
Step 2: Customize your DVD
To get a perfect DVD according to your taste, the next step after importing the video is to edit your video, photo and add a DVD menu for your DVD.
Video Editing
Click the pencil icon on the imported window. The icons, Enhance, Trim, Watermark, Subtitle, for video editing are well arranges on the pop-up window. Just click each of the icons to personalize your video.
Enhance: You can set the screen ratio, 16:9, or 4:3, or keep original, etc.Also you can add effect to your video, gray, emboss, negative or old film. Adjusting brightness, contrast, saturation, or volume of the video is also available.
Trim: You can set start time and end time to extract a video clip.
Watermark: Apply an image or text watermark to your video. You can also set the placement, size, or transparency of the watermark.
Subtitle: You can add subtitle to your video and customize it by setting the font, size, transparency, placement, etc.

Photo Editing
Still, you can click the pencil to open the photo editing window with the 3 icons, Text , Transition, and Music.
Text: You can add text to your photo and drag the text on the image to put it in the right place.
Also you can set font, size, color, and style for the text.
Transition: It allows you to set the photo duration time, transition effect, and translation duration.
Music: You are allowed to add background music for your photo. You can also trim your favorite part of the music and apply it in your photo.

After all are done, just click the “OK” button at the right bottom of the interface, or you can click Reset to restart customizingthe video and photo.
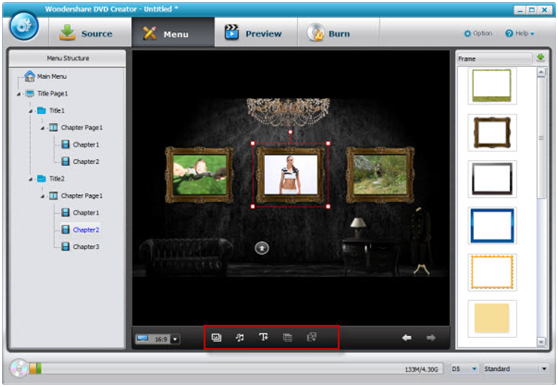
Add DVD Menu
After editing your video and photo, click the “Menu” icon on the top of the interface. This software is equipped with many eye-catching DVD menu templates to choose from. Also if you have more needs, just click the download button on the top right to the interface to have more.
In the Menu tab, you can also customize your DVD menu’s background image and music.Besides, you can add text on the menu.To preview and edit each chapter of your menu, you can just click the“←”“→” button.
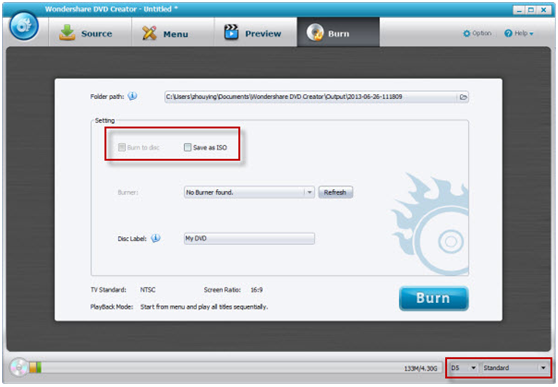
Step 3: Preview and Burn DVD
Finallyyou’ve got to the last step. Just click the“Preview” icon to preview it. Then click “Burn” tab to start to burn your video.
With Wondershare DVD Creator, it is for sure that you will get a spectacular masterpiece to make everyone surprised. Just go for it!